PNM User’s Guide
- Quick Start for Making Monitoring Phone Calls
- Quick Start For Making Response Time Measurement (RTM) Monitoring Phone Calls
- Sign Up Steps 1- 4
- PNM User’s Section
- Account Information
- Your Account Profile
- View Account Balance and Purchase Credits
- PNM Service Configuration; Setting Up Service
- Monitoring Plans
- Reports
- Response Time Measurement (RTM) chain example #1
- Response Time Measurement (RTM) chain example #2



- Complete the PNM Sign Up process and log into your account
- Click PNM Service Configuration
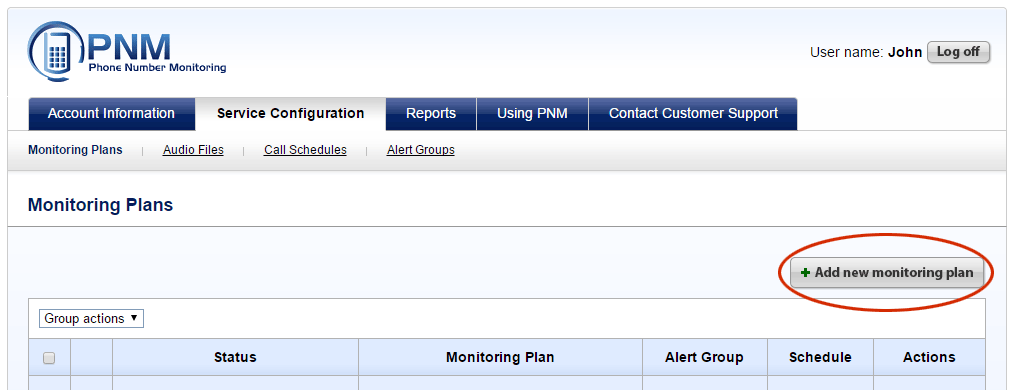
- Click Add New Monitoring Plan
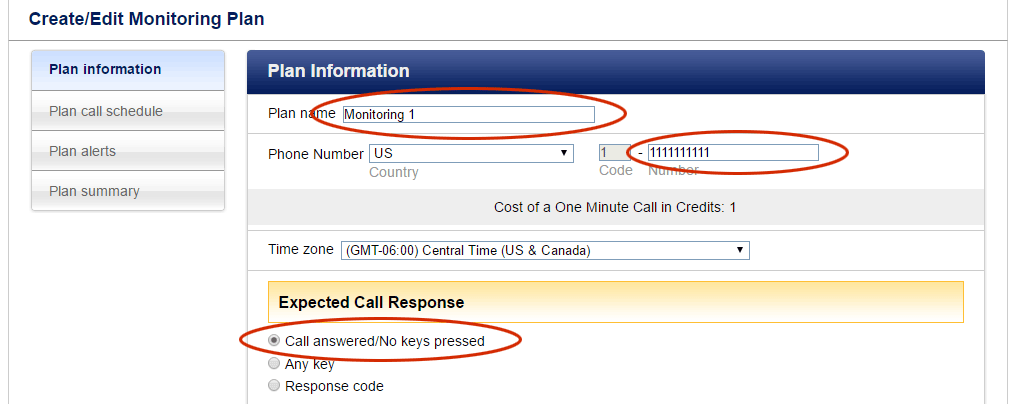
- Enter plan name, phone information and select call options
- Build an RTM chain that parallels the progress of the call, use:
- Delays – wait for recordings, announcements
- Send Digits – enter digits for extensions or responses to call path (e.g. press 1 for sales)
- Play File – play audio file for audio response to call path, call information and instructions. Select audio file from list or Click Create Audio File and either download a file, enter text for text to voice file or record your own audio over the phone
- Enter the response code(s) for the end user identification
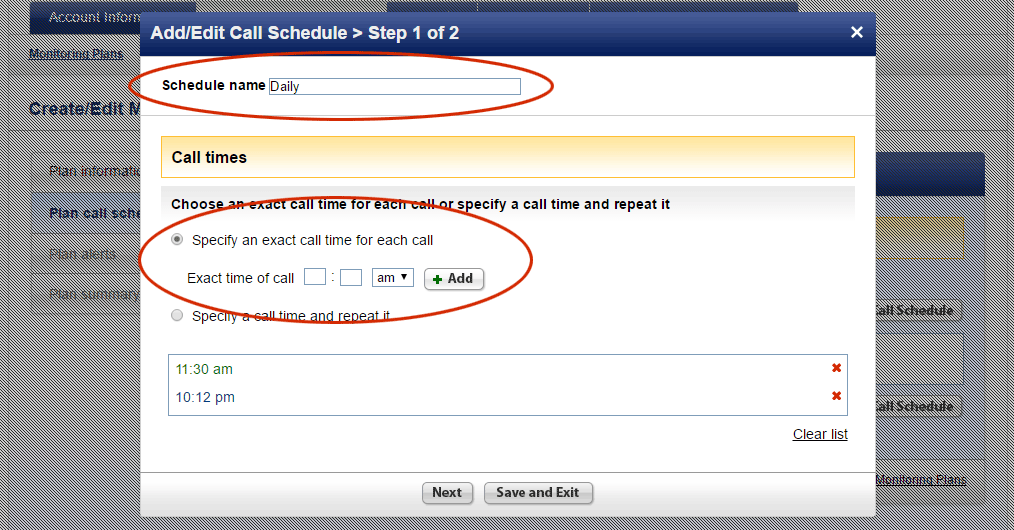
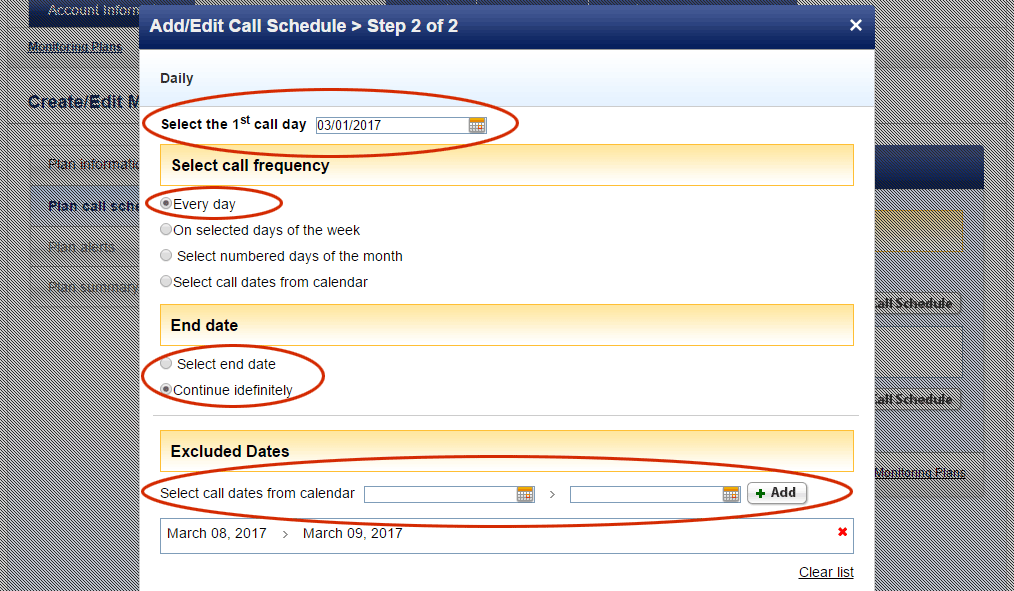
- Click on Add a Call Schedule and enter a schedule name and pick call timesSpecify a first call date, chose a call frequency, end date and any exclusion dates
- Select Alert Conditions (optional) and create an Alert Group or skip to Plan Summary.
- Create an Alert Group by clicking on Add Alert and give the group a name and specify whether you want alert phone calls to be executed simultaneously or sequentially. Enter contact information for alert calls, text messages and email addresses
- Plan Summary, review the plan, edit if necessary and Activate the plan
Sign Up Steps 1- 4
- Step #1 Enter user profile information
- Step #2 Choose between Regular Monitoring Call account and the advanced Response Time Measurement (RTM) Monitoring Call account (the RTM account allows you to place both regular monitoring calls and RTM calls)
- Select and purchase a monitoring call package and call credits
- Step #3 Enter credit card information/credit card validation
- Step #4 Contact phone number is validated. A phone call is placed to the user’s contact phone number by PNM; the user enters a code spoken over the phone on to the computer screen
PNM User’s Section
- Account Information
- Service Configuration
- Reports
- Resources
- Contact Customer Support
Once you have gone through the PNM sign up process and established a PNM account, you will be directed to, or you can log in to the PNM Users Section. Landing on the Account Profile web page, you can access all other User Section web pages through each of the major headings:
Account Information
Listed under the Account Information heading are the Account Profile, for viewing and changing your account information; Account Balance and Purchase Credits, used to view account financial information, change packages and purchase credits; and Billing History used to view billing information and obtain receipts.
Your Account Profile
When logging into your account you will land on the Account Profile web page. You can then view or update your account information or access any other User Section web pages through each of the major User Section headings.
-
Update Account Profile
From the Account Profile web page, you can use the Update function to view or change your:
- Contact name.
- Company name.
- Contact email address.
- Country.
- Time zone.
- Account/package type – Regular or advanced Response Time Measurement To change your account/monitoring package type, go to Account Balance and Purchase Credits and select ‘Change PMN Package’.
- Account PIN number – The PNM account PIN number is only used to identify your account when creating audio files via phone call.
-
Change Password
Follow the instructions and be sure to make a record of your new password.
-
Update Contact Phone Number
Changing a contact phone number requires the same verification process as did the initial contact phone number i.e. your new contact phone number will be called by PNM, you will receive a validation code that must be entered on to the computer screen. You will be charged the appropriate number of call credits when making the call.
-
Update Credit Card Information
Use this page to change credit cards or update an expired card
View Account Balance and Purchase Credits
This page allows you to view your current call credit balance, your last credit purchase and your current monitoring package. You may also purchase additional credits or sign up for the automatic purchase of call credits. For the automatic call credit purchase simply select ‘Automatic call credit purchase’, specify at what level of call credits you want the purchase to take place and the amount of call credits to be purchased. Anytime call credits are purchased an email will be sent to the contact email address listed on your account.
PNM Service Configuration
When you select the PNM Service Configuration tab you will land on the Monitoring Plans page which allows you to create, select and edit monitoring plans. Additional choices under the PNM Service Configuration tab include the Audio Files tab that lists audio files and allows you to create new files; the Call Schedules tab that lists and allows the creation and edit of call schedules; and the Alert Groups tab that lists and also provides for the creation and editing of alert groups.
Monitoring Plans
The monitoring plan is the heart of the PNM service. It contains the monitor phone number information, a call schedule and optional alert group(s). When a Monitoring Plan is created it is listed on the Monitoring Plan web page. For each plan listed on the Monitoring Plan web page, you are able to perform the following individual plan actions:
- Enable/Disable – Start/stop all plan functions
- Edit – Clicking on ‘Edit’ takes you to the selected plan’s Plan Information web page allowing you to edit the monitoring plan
- Clone – Duplicates the selected plan and adds a (1) to the plan name
- Delete – Removes the plan from the Monitoring Plan list
For all plans listed on the Monitoring Plan page, you are able to perform the following Group Actions:
- Enable – Start all plan functions for the selected plans
- Disable – Stop all plan functions for the selected plans
- Clone – Duplicate the selected plans and add a (1) to the plan name
- Delete – Remove the selected plans from the Monitoring Plan list
Create a Monitoring Plan
-
- Begin from the Monitoring Plan page, click ‘Add a Monitoring Plan’ which takes you to the Plan Information page.
- Enter a Name for the plan (up to 20 alphanumeric characters), the Phone Number to be monitored and the Country from which the phone number originates. PNM will automatically enter the proper Country Code for the phone number and provide the cost of the call in Call Credits per minute. Enter the Time Zone where the phone number originates; all calls placed by PNM to that number will be relative to the specified time zone.
- Select the ‘Expected Call Response’ that you wish to receive from the person answering the monitor call:
- Answer only
- Any key pressed
- Enter four digit response code
- Select a greeting (played as soon as the call is answered) from the PNM pre-recorded greeting files or click on ‘Create Audio File’ and you will be sent to the Create Audio File web page where you can create your own greeting. PNM Standard Greetings normally used with available call responses are:
- Standard File #1 – ‘This is the PNM system calling… Thank You, Goodbye’ used with call response – Call answered/No keys pressed
- Standard File #2 – ‘This is the PNM system calling, please enter your response now’ used with call response – Any key
- Standard File #3 – ‘This is the PNM system calling, please enter your 4-digit response code, followed by # sign’ used with call response – Response code
- Select any of the following call retry and time delay options that may be applicable to calls that don’t arrive at the monitor phone number or calls that do not receive the proper response:
- Busy
- No Answer
- Phone System Error
- No Response
- Select a Call Schedule from the list of call schedules or click on ‘Add New Call Schedule’ to go to the Add/Edit Call Schedule web page where you can create a new schedule
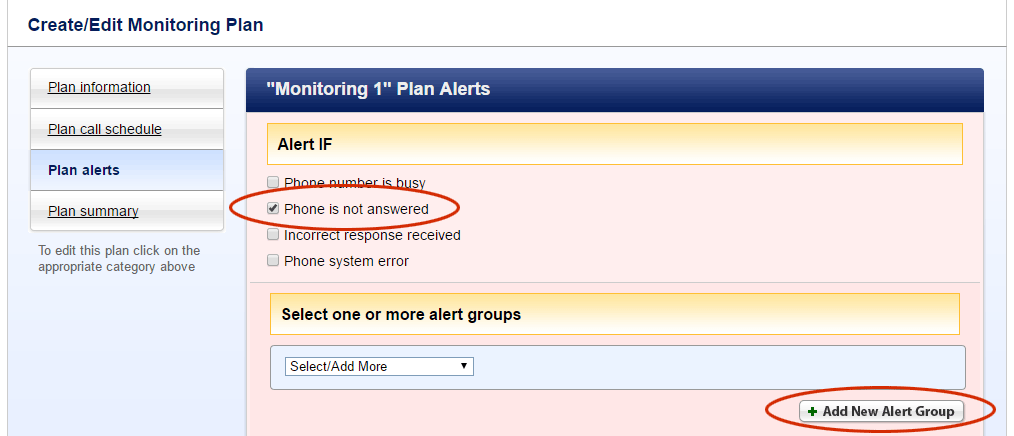
- Choose to include or omit Alerts. You will receive an alert if any of the following conditions are selected and then met when the monitoring call is placed:
- Phone number is busy
- Phone is not answered
- Incorrect response received
- Phone system error
If no alert conditions are specified, you can still view specific call information by logging into your PNM account online and clicking on ‘Reports’:
- Select one or more Alert Groups or click on ‘Add New’ to go to the Add/Edit Alert Group web page and create an alert group
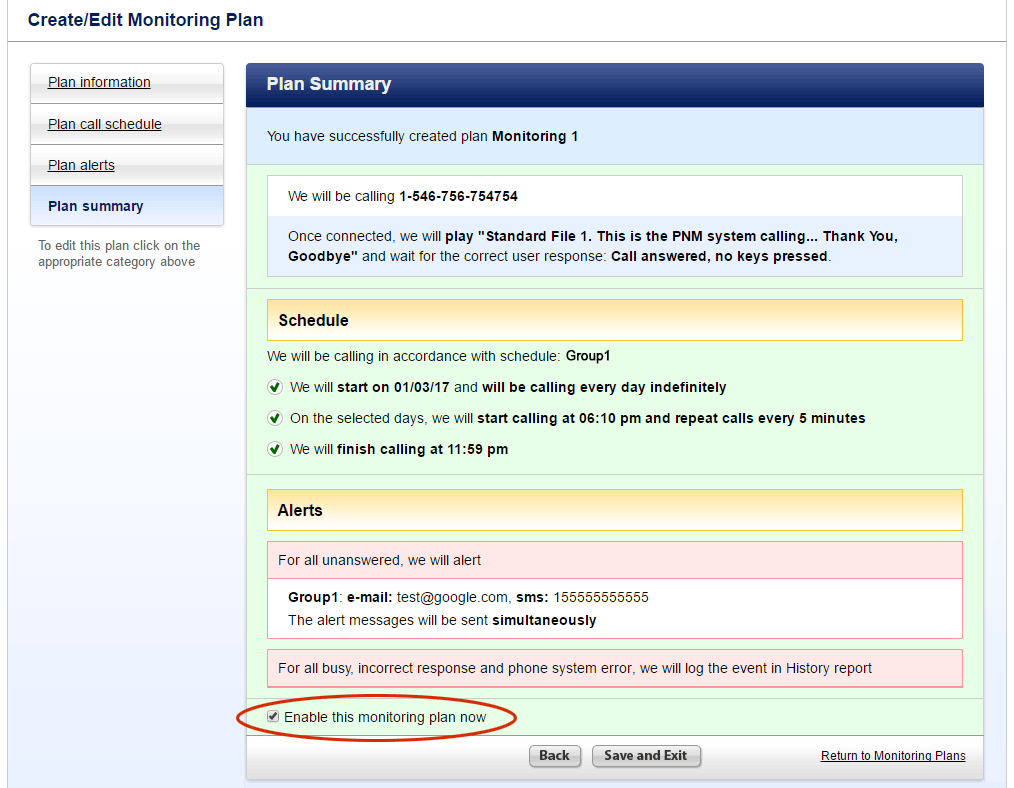
- The Plan Summary web page provides a listing of all of the elements that make up the plan. To edit the plan, click on one of the categories on the left menu or use the ‘Back’ button at the bottom of the page. To activate the plan click on ‘Enable this monitoring plan now’. Clicking on ‘Save and Exit’ will add the plan to the list of monitoring plans and return you to the Monitoring Plan page.
Creating a Response Time Measurement (RTM) Monitoring Plan
PNM offers an optional feature that can be used for:
- Assessment of call hold times when calls are answered and placed in a queue, or to
- Track call routing to confirm call destinations and arrival times.
To set up an RTM plan, begin the normal monitoring plan creation process and when you come to the ‘If this is a Response Time Measurement phone number’ – click the box and a special RTM section will appear. Using the RTM option requires building an RTM chain which is simply a chain of events that is executed in parallel to the actual call path. An example of a RTM chain is presented at the end of the Set Up Guide
Building an RTM Chain
- RTM timeout Sec., enter the time in seconds that is the maximum time allowed from call connect to when a call is answered and a designated response code is entered. If the specified time is exceeded the call will automatically terminate. Allowance should be made for hold times or delays in answering calls.
- Build the RTM chain consisting of:
- Delays – specify an amount of time in seconds to accommodate that portion of calls that contain greetings or instructional messages.
- Send Digits – use this feature to specify an extension or select a branch within a call e.g. press ‘1’ for sales. Use the optional ‘Comments’ fields to identify what the digits are used for.
- Play Audio File – use this feature for a verbal response to a request e.g. ‘speak the name of the destination city’. At least one ‘Play Audio File’ command must be included as the last element in the RTM chain. The last audio file should instruct the person answering the call to enter a specified four digit response code i.e. ‘enter your four digit response code now’. The last audio file, when activated, plays continuously until the call is answered with the proper response, or the call times out.
- For the ‘Expected Call Response’ that you wish to receive from the person answering the monitor call, enter from one to six four digit response codes. At least one response code must be entered.
- Select ‘Record Call’ if you wish to have an audio record of the call. You can listen to a recorded call by going online and logging into your account and going to PNM Reports web page.
- Continue with the normal plan creation; go to #6 above in Create a Monitoring Plan
Create a Call Schedule
Add/Edit Call Schedule (Step 1)
A call schedule is necessary to specify the time(s) and date(s) when you want PNM to place your monitor calls. When completed and saved the call schedule will be placed on the call schedule list where it will available for editing or inclusion into a monitoring plan.
- Select a name for your schedule (up to 20 alphanumeric characters)
- Specify the times of your monitor calls by:
- specifying the exact times within a 24 hour period that you want to place monitor calls or
- choose the time of your first call, and then a time interval to repeat the call
- If you choose to repeat the call at a specified time interval, you must either specify a time when you want to stop repeating the calls or you may choose to continue the calls indefinitely
- Also, if you choose to repeat the call at a specified time interval, you will have the option to specify a block(s) of time when calls can be excluded
Add/Edit Call Schedule (Step 2)
- Specify the date of your first call
- Select a call frequency:
- Every day
- Specified days of the week i.e. Monday, Tuesday, etc.
- Numbered days of the month i.e. 1st, 15th, 30th etc.(enter as 1,15,30). You may also select the ‘Last day of the month’, ‘2nd to the last day of the month’ or ‘3rd to the last day of the month’ to maintain consistency between months.PNM will call on every date specified. Date overlaps or redundant dates are permitted.
- Choose your call days from a calendar
- Specify a date when to stop calling (calls will be made up until midnight on that date) or select to continue calling indefinitely.
- Exclude (optional) the days of the month that you do not want to make calls by:
- Selecting specific days or a period of consecutive days from a calendar
- Selecting numbered days of the month (enter as: 2,3,4,12) You may also select the ‘Last day of the month’, ‘2nd to the last day of the month’ or ’3rd to the last day of the month’ to maintain consistency between months. PNM will call on every date specified. Date overlaps or redundant dates are permitted.
- Selecting specific holidays from a list of holidays
Create an Alert Group
Add/Edit Alert Group
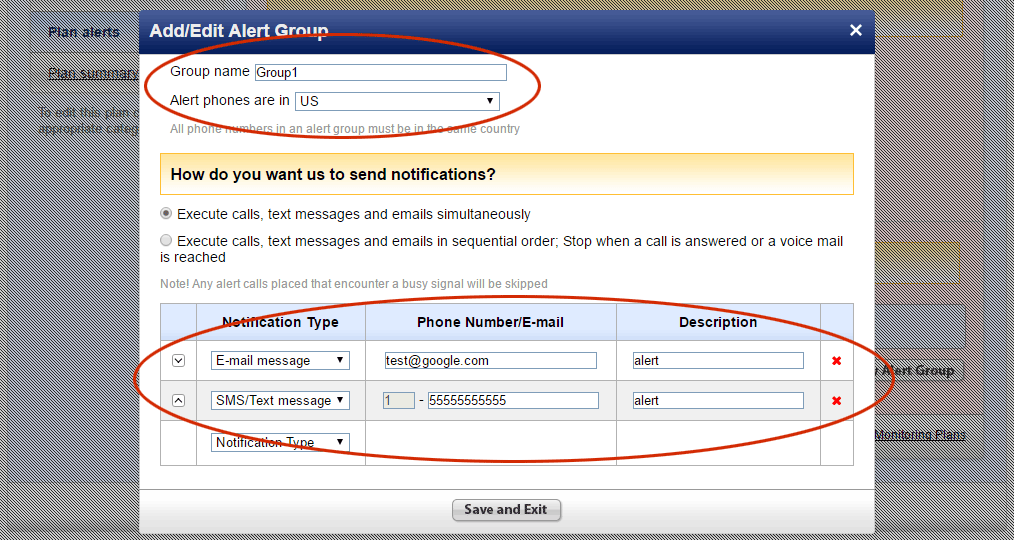
An alert group (optional) provides the information as to whom to notify via phone call, text (SMS) message or email message when a monitor call fails one of the alert criteria. Multiple alert groups in a single plan are permitted. To create an Alert Group:
- Enter a name (up to 20 alphanumeric characters) for the Alert Group
- Select a Country where the alert phone number(s) are located. All alert phone numbers for a specific Alert Group must be in the same country. PNM will automatically add the Country Code
- Specify whether you want alert phone calls to be executed simultaneously or sequentially.
- If Simultaneous Calling is selected all alert calls, emails and text messages in the Alert Group will be sent immediately. Any alert calls that encounter a busy signal will be skipped and not retried
- If Sequential Calling is selected, alert calls, emails and text messages will be sent in the order that they appear in the Alert Group observing the following rules:
- When an alert call is answered, either by a person or answering device any alert calls, emails or text messages that follow the alert call will not be placed or sent.
- If an alert call goes unanswered PNM will continue executing the items in the Alert Group in the order that they appear until it runs out of items or places an alert call that is answered.
- Any alert calls that encounter a busy signal will be skipped and not retried.
- When completed and saved the Alert Group will be placed on the list of Alert Groups where it will available for editing or inclusion into a monitoring plan.
Monitoring Plan Summary
The monitoring Plan Summary web page can be reached via the edit function on the Monitoring Plan web page or as the final step after completing the Plan Alert web page when completing a monitoring plan. The monitoring Plan Summary web page contains a complete description of the plan and all of its elements. It provides a means to review the monitoring plan, links to edit the plan and a check box to activate the plan. Newly created monitoring plans are placed on the monitoring plan list when leaving the plan summary page.
Edit a Monitoring Plan
A monitoring plan can be edited from the Monitoring Plan web page by clicking the ‘Edit’ function or from the Plan Summary page by selecting Plan Information, Plan Call Schedule or Plan Alerts depending on which part of the plan requires editing.
Edit a Call Schedule
A call schedule can be edited by either:
- Clicking on the edit link associated with a selected call schedule when on the Create/Edit Monitoring Plan web page or
- Selecting the ‘Call Schedules’ heading from under PNM Service Configuration and
- Choosing a call schedule from the list
- Selecting the ‘Edit’ action link and arriving on the Add/Edit Call Schedule, Step 1 web page.
Edit an Alert Group
An Alert Group can be edited by either:
- Clicking on the edit link after selecting an Alert Group when on the Create/Edit Monitoring Plan, Plan Alerts web page. This will send you to the Add/Edit Alert Group web page.
- Selecting the Alert Groups heading under the PNM Service Configuration
- Choose a call schedule from the list
- Select the ‘Edit’ action link and you will arrive on the Add/Edit Alert Group web page.
Enable/Disable Monitoring Plan
A Monitoring Plan can be enabled or disabled using the ‘Actions’ or ‘Group Actions’ on the Monitoring Plans page or by clicking the ‘Enable this monitoring plan now’ box on the Plan Summary page.
Audio Files
- For regular monitoring calls, when entering the monitoring plan information on the Plan Information page, you either select an audio file greeting from the list of greetings or create a file by clicking on ‘Create Audio File’.
- For RTM calls, when building a RTM chain on the Plan Information page, either selects an audio file(s) from the list of audio files or uploads/creates a file by clicking on ‘Create Audio File’.
Audio files are can be accessed when creating a monitoring plan from the Plan Information web page as described above or by selecting ‘Audio Files’ under Service Configuration. The Audio Files web page contains the list of Standard and user uploaded/created audio files, and a link to ‘Create Audio File’. A ‘Group Action’ allows one or more user files to be deleted. A list of ‘Actions’ associated with each file on the list provides Playback, Download, Delete and Edit functions for user files and Playback and Download functions for Standard Files.
Standard Audio Files and User Created/Uploaded Audio Files
- Standard Audio FilesThe Standard Audio Files can be used when the Expected Call Response is:
- Standard File #1 – Call answered/No keys pressed
- Standard File #2 – Any key
- Standard File #3 – Response code
- User Created/Uploaded Audio FilesTo create or upload an audio greeting or RTM voice response file choose ‘Create Audio File’ from the Plan Information. web page or choose Audio Files under the PNM Service Configuration heading and select ‘Create Audio File’. A play time (seconds) is associated with each file for RTM use when building an RTM chain. Greeting and RTM files can be created by uploading your own pre-recorded .wav file, typing text into a text box for text to voice conversion or by recording an audio file over the phone:
- Upload Pre-recorded .wav file For this option enter or browse for the file address and give the file a name. It is recommended that you always ‘Play’ a downloaded file to be sure that the file quality is consistent throughout.
- Create a Text to voice file Type in your greeting or voice response information and give the file a name. PNM will convert the text to voice and add the file to the audio files list.
- Create a Voice File via Phone To record your greeting over the phone please call 1-567-251-7514 and follow the menu prompts: ‘This is Phone Number Monitoring voice audio files recording; please enter your pin number followed by the # key’ (The PIN can be found on the Account Information, Account Profile web page)
- ‘Press 2 to begin recording’
- ‘At the tone, begin speaking and press any key when finished’
- ‘Press 1 to listen to the message’
- ‘Press 2 to cancel and re-record’
- ‘Press 3 to save’
- ‘Audio file saved, press 2 to create another audio file or hang up’The voice file will appear in the list of audio files with the name: X, Date, A = AM or P = PM and time (hour, min. and sec.) to rename the file select ‘Edit’ from the Actions and enter the new file name.
Reports
PNM provides online access (after account login) for you to generate, view, download and print regular monitoring or Response Time Measurement call reports. The reports can be generated using search criteria and a set of filters. Each report also produces a statistical summary of the key call parameters. Recorded calls, if selected when setting up the monitoring plan, can be played and listened to by the user.
Setting up a report using the PNM search criteria
For Regular Accounts to set up a call report select an individual plan or all plans from the Select Plan Name List. For Response Time Measurement (RTM) Accounts, select All Regular Monitoring plans individual Regular Plans; or all RTM Plans, or a specific RTM plan from the list of plans. You can then narrow the results by adding the appropriate data filter.
- Selecting ‘Select All Regular Monitoring Plans’ or a single named Regular Monitoring plan from the list of plans provides a choice of filters:
- By Dates
- By Phone Number
- By Results
- Success
- Answer Only
- Any Key
- Response Code Any
- Response Code Enter
- Fail
- Busy
- No answer
- Phone System Error
- No Response Any Key
- Incorrect Response Code
- Success
- Selecting ‘RTM Monitoring Plans’ or a single named RTM Monitoring plan provides you with a choice of filters:
- By Dates
- By Phone Number
- By Results
- Success
- Response Code Enter
- Fail
- Busy
- No answer
- Phone System Error
- Incorrect Response Code
- Success
A statistical summary of the search results will be presented as part of the results
For non-RTM Calls:
- Number of Calls
- Number of Failed Calls – Busy
- Number of Failed Calls – No Answer
- Number of Failed Calls – Phone System Error
- Number of Connected Calls
- Number of Connected Calls with Correct Response
For RTM Calls:
- Number of Calls
- Number of Failed Calls – Busy
- Number of Failed Calls – No Answer
- Number of Failed Calls – Phone System Error
- Number of Connected Calls
- Number of Successful Connected Calls (Correct Response Received)
- Number of Failed Connected Calls (Incorrect Response Code / RTM Timeout)
- Maximum Response Time
- Minimum Response Time
- Average Response Time
A call list provides information about each scheduled monitor call and detail as to the disposition of each call along with retry information ![]() Clicking the small gold triangle associated with each call will provide an additional level of call detail including retry call information and then another level of detail containing alert – call, text and email information.
Clicking the small gold triangle associated with each call will provide an additional level of call detail including retry call information and then another level of detail containing alert – call, text and email information.
Listening to a recorded Response Time Measurement (RTM) call
If you choose to record a RTM call by clicking the Record Call button on the Monitoring Plan Information web page then that call will be available for listening or download by clicking on the gold triangle associated with each listed call on a report. The Record Call information is available on the second level of detail for each recorded call.
Printing reports
To print a report simply choose from one of the categories:
- Print All Pages
- Print Current Page
- Print Selected Pages (1,2,3)
Downloading Reports
Export to CSV
- Export All Pages
- Export Current Page
- Export Selected Pages (1,2,3)
Response Time Measurement (RTM) Chain Example #1 Digital Response
In this example a call is placed to an equipment sales company. The person who answers the phone at the conclusion of the call chain will enter response code 2345 or 6234. The call will be recorded and available for playback by logging on and going to the PNM Reports web page. The total aloted time for the call to take place is 125 seconds. If the response code is not received by PNM within the 125 seconds the call will be terminated. The RTM chain parallels the progress of the call as follows:
| Call | RTM Chain |
|---|---|
| 1) Call answered; greeting played. Choose between Sales 1, Customer Support 2, or Shipping 3 | 25 second delay is allowed for the greeting to finish Customer Send Digits #1 is used to select Sales |
| 2) Anouncement requests: New Equipment 1, Used Equipment 2 | 11 second delay is allowed for the announcement to finish Send Digits #2 is used to select Used Equipment Sales |
| 3) Brief announcement | 8 second delay is allowed for the announcement to finish |
| 4) Phone rings for sales agent | Standard File 3. ‘This is the PNM system calling, please enter your 4-digit response code, followed by # sign’ is played continuously with a brief 3 second pause in between. |
| 5) Sales agent answers call and enters four digit response code | Call is terminated and the call time recorded |
Actual PNM User Web Page

Response Time Measurement (RTM) Chain Example #2 Audio Response
In this example a call is placed to a telephone and cable company. Responses to requests to ‘say one’ or ‘say telephone’ are audio. The person who answers the phone at the conclusion of the call chain will enter response code 2467. The call will be recorded and available for playback by logging on and going to the PNM Reports web page. The total aloted time for the call to take place is 110 seconds. If the response code is not received by PNM within the 110 seconds the call will be terminated. The RTM chain parallels the progress of the call as follows:
| Call | RTM Chain |
|---|---|
| 1) Call answered; greeting played. Response to ‘are you a customer Of Brookfield telephone and Cable?’ | 18 second delay is allowed for the greeting to finish Play audio file ‘Yes’ |
| 2) Anouncement requests: Enter or Say ‘1’ for technical help or enter or say ‘2’ for billing | 8 second delay is allowed for the announcement Play audio file ‘One’ |
| 3) Brief announcement; say ‘telephone’ or ‘cable’ | 6 second delay is allowed for the announcement to finish Play audio file ‘telephone’ |
| 4) Brief announcement ‘connecting’ | 6 second delay is allowed for the announcement to finish |
| 5) Phone rings for telephone technican | Audio file ‘Brookside cable and telephone test call. Please enter your four digit response code followed by # sign’ is played continuously with a brief 3 second pause in between. |
| 6) Telephone technican answers call and enters four digit response code | Call is terminated and the call time recorded |
Actual PNM User Web Page


